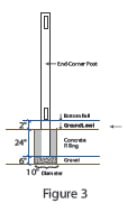
1)Dig all end and corner post holes first, 10 inches in diameter and 30 inches deep.
Note: Post depth and diameter will be determined by local weather and soil conditions.2) Insert end and corner posts into holes and set them in concrete filling to 2 inches below ground level.
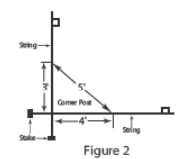
3) Level and plumb post, as per figure
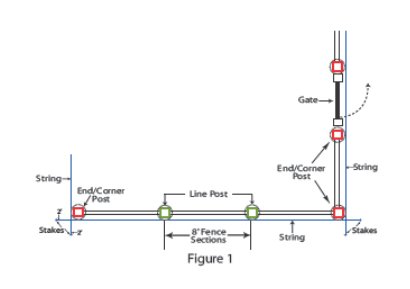
4) Stake a string line across the top of the end and corner posts to mark the desired height of the line posts, as shown in the figure below.
5) Now stake out the positions of the line posts along the string line, as per the figure.
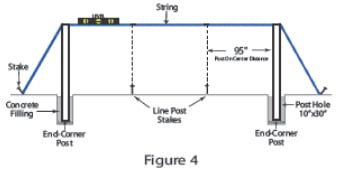
Depending on the distance between end and corner posts, the line posts may not be on 8-foot centers. In this case, you have to choose one of these two options:
a) You can keep the line posts on 8-foot centers and position one line post to a smaller distance. This means you will end up cutting one fence section down to size. (This is the easier approach in terms of man hours)
b) You can position all the line posts at a smaller, even distance and cut down the width of each fence section. (This is the harder approach, but the sections look even).
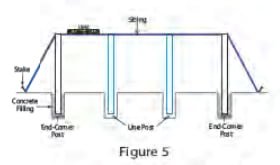
6) Dig the holes for all the line posts as per figure 5.
Repeat steps 4 through 6 for all fence lines
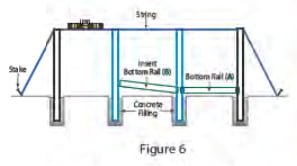
Now start installing the line posts and then the bottom rails.
Slide the bottom rail (A) into the bottom hole of the terminal post. Starting down the fence line, place the next post into the next hole. Now slide the next bottom rail (B) into the bottom hole of the next post as per figure below. Repeat these steps until all posts are set with bottom rails inserted.
Note: If post spacing is less than 8 feet on the center, cut a piece from the end of the top and bottom rails to get the desired length
Fill the post hold with concrete. Make sure that the post is set at the correct height and is square, level and plumb with the fence line as per the figure below
All of the posts require concrete on the outside base. For added strength, the end and corner posts should be filled up to 2 feet from the top of the post with concrete and rebar.
Note: Before filling gate posts with concrete, make sure that the gate hardware is installed following the instructions in the gate section
Each end, corner or gate post takes two pieces of ½-foot diameter rebar cut 4 inches shorter than the post length located at opposing corners of post as shown in figure 8
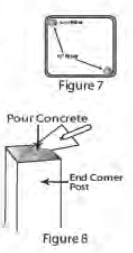
Now fill the posts with concrete. Tapping on the sides of the post, remove air pockets in the concrete, as shown in figure 8
Clean up the excess concrete with water before it dries.
| 4×4 Line Posts = approx 100 lbs | 4×4 End, Corner, Gate post = approx 160 lbs |
| 5×5 Line Posts = approx 140 lbs | 5×5 End, Corner, Gate post = approx 260 lbs |
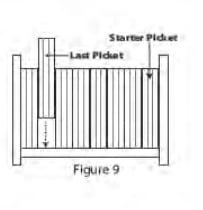
Starting on one end, insert the starter picket into the bottom rail. Continue across the panel inserting the remaining pickets and interlocking the tongues and grooves of the pickets
As you approach the end of the panel, insert picket on the opposite post and move toward the center, keeping the tongue and groove in the same direction. Then slide the last picket in from the top, approximately two or three pickets in from the post, as per figure 9.
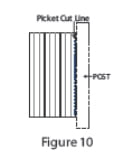
Note: If post spacing is less than 8 feet on the center, you can cut the picket board on one side. The cut end of the picket always goes against the post, as per the figure
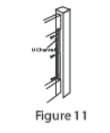
Note: If U channels are required (i.e. on darker fence colors), center the U channel on the post between the bottom and top rail holes. Position the flat side of the U channel against the post and secure the channels to the posts using #8 x 3/4′ stainless steel self-tapping screws, as per the figure.
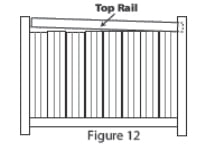
To insert the top rail, place one end of the top rail into the post and work your way down the panel, pushing the pickets into the top rail as you go, as per the figure.
To insert the top rail, place one end of the top rail into the post and work your way down the panel, pushing the pickets into the top rail as you go, as per the figure
After the last picket is inserted, slide the rail into the post. Repeat these steps to assemble all panels
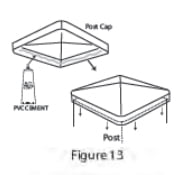
Install the post cap on post by applying PVC glue on the inside of the cap, as per the figure.
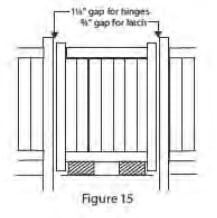
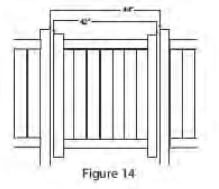
Set privacy fence and gate posts 44 inches apart to allow for hardware and gate. Gates are 42 inches wide with a 2-inch gap to accommodate hinge and latch.
Set traditional and perimeter gate posts 49 inches apart to allow for hardware and gate. Gates are 47 inches wide with a 2-inch gap to accommodate hinge and latch.
For narrower openings, gates can be cut to size, as per figure.
Assemble the gate following instructions in the gate kit
Position gate in the opening by blocking up the gate so that the rails of the gate line up with the rails of the fence.
Attach hinges to hinge post and latch catch to latch post before filling posts with concrete.
Ensure that the gate posts are filled with concrete and rebar and set for 72 hours before hanging gate.
Hang the gate by attaching the hinges to the gate.
Position latch bar on gate and secure.